INSTAGRAM

Showing posts with label Tutorial. Show all posts

Thursday, September 18, 2014

DIY Scalloped Series: Necklace


Materials:
Glue gun
Paint brush
Acrylic paint
Thin wooden semicircles (Note: I started with 4 circles and sawed them in half to get 8 semicircles)
Ribbon the thickness of the wooden semicircles (I used a length about 30 inches)
Step 1: Paint the wooden semicircles with your desired color or pattern. 
As you can see, I gave mine a golden edge and painted one side mint green. When I want a more neutral necklace I can wear it with the wooden side showing to match my hair and skin.
Step 2: Center and hot glue the painted semicircles onto the ribbon to make a row of scallops. 
The extra ribbon at the ends can be tied in a bow as the closure.
Ta-da!

Monday, September 08, 2014

DIY Scalloped Series: Collared Shirt

A polo shirt can be updated with this scalloped collar because the piqué frays minimally and holds its shape.
Materials: 
Polo shirt
Matching thread
Sewing machine
Tape measure
Scissors
Pencil
Step 1: Measure the circumference of the collar to figure out how to divide it up into evenly sized scallops. I decided to mark my collar every 2 inches because it is about 18 inches long.
Step 2: After measuring and marking draw the scallops in with pencil.
Step 3: Snip along the scalloped line.
Step 4: Top stitch the edge and wear with joy!

Tuesday, August 26, 2014

DIY Scalloped Series: Shorts

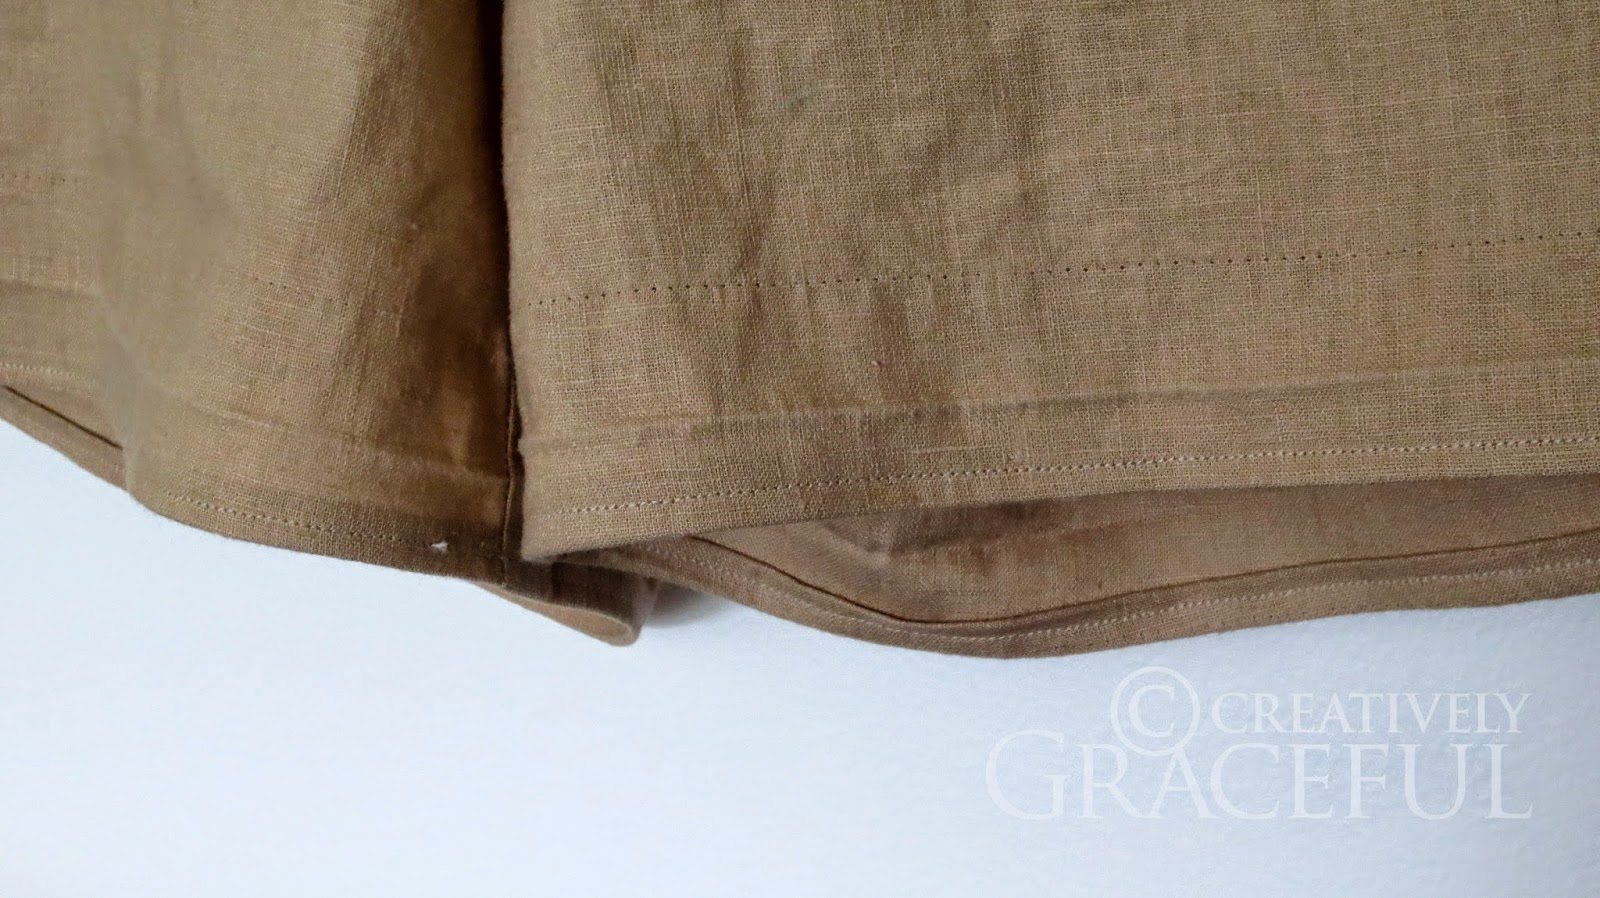
This is part 1 of 3 of a delightful DIY series to incorporate more scalloped items into your wardrobe. Because who doesn't want more scalloped items in their wardrobe? I have wanted to make a pair of scalloped shorts for the past several years, but I could never figure out the best way to go about it. Since I wasn't planning on wearing felt shorts, for example, there was always the problem of fraying edges to deal with, but neither anti-fray glue nor bias tape seemed like the right answer. Then one night while I was falling asleep I dreamed up this solution. When I woke up I tried it out on a scrap of fabric and it seemed promising, and it is. So here we are:
Materials:
Pair of mid-calf shorts (I got this beige linen pair for about $3 at Value Village)
Matching thread
Sewing machine
Sewing scissors
Tape measure
Pencil 
Pins
Iron
Originally these shorts had a 1-inch hem, so I picked it out and sewed a new quarter-inch hem to ensure that when I made the scallops the legs didn't become too short. You may need to do this as well depending on the original length of your shorts. Consider this an optional warning before you begin.
Step 1: Starting with the shorts right-side-out, fold the up the hem, revealing the inside of the leg. You should have a 1-inch space between the folded edge and  the inside edge of the hem. Your scallops will then have a height of an inch.
Step 2: Measure the circumference of the leg hole and decide on what you will divide it by to make the scallops. For example, on this pair the legs each had a circumference of 25 inches, so I pinned each leg every 2.5 inches to outline a space for 10 scallops.
Step 3: Sketch the scallops in the pinned spaces with pencil. 
Step 4: Sew along the scalloped pencil line.
Step 5: Clip out the excess fabric from the scalloped line to reveal the scallops.
Step 6: Flip the scallops inside-out  (well, right-side-out) so that the seams are contained within the scallops.
Step 7: Now that the scallops are right-side-out, iron them flat and smooth. 
Step 8: Top stitch along the full length of the scallops to secure them in place. As you can see, my scallops are not perfect even after the tedious ironing and top stitching, so don't expect perfection unless you are an expert seamstress! But hey, the fraying threads are tucked safely and cleanly away in the leg and the scallops are visible, so that's cause for excitement!
Enjoy! Parts 2 and 3 of different scalloped garments still to come!

Wednesday, August 20, 2014

DIY Pom-Pom Craspedia

Materials: 
Embroidery needle
Wire for stems
Yellow yarn
Scissors
Fork
Step 1: Snip off a few inches of yarn and set it aside.
Step 2: Wrap the yarn from the ball through the tines of the fork, and then around the fork multiple times. 
The more times you wrap it around, the tighter your pom-pom will be.
Step 3: Use the embroidery needle to pull the piece of yarn between the fork tines.
Step 4: Tie the wrapped bundle of yarn tightly in the middle.
Step 5: Slide the bundle of yarn off the fork and cut open the looped ends.
Step 6: Trim down the ends to make the pom-pom tight, and fluff it up as you go.
Step 7: Push the pom-pom onto the piece of wire.
Then find a cute vase for your bouquet!

Sunday, July 13, 2014

DIY Stamp Shirt in Moustache

Stamps are an easy way to make an all-over print on a shirt.
Materials:
T-shirt of choice
Similarly sized piece of cardboard
Acrylic or fabric paint
Paintbrush
Stamp
Step 1: Insert the cardboard into the shirt so the fabric surface is smooth.
Step 2: Load the stamp up with paint.
Step 3: Stamp and repeat! (Pretty self-explanatory!)

Tuesday, June 17, 2014

DIY Golden Laurel Frame


Materials:
Glue gun
Paintbrush
Gold acrylic paint
Round picture frame
Dry bay leaves of increasing size (I used 16 in total--8 pairs of similarly sized leaves. Obviously the bigger the frame, the more leaves you will need)
Step 1: Paint the bay leaves gold. I did two coats per side.

Step 2: If your frame is varnished you may need to sand it a bit first. Then give it a couple coats of gold acrylic.
Step 3: Starting with the largest size, glue the pairs of leaves with a slight overlap on opposite sides of the frame to create the laurel crown shape.
Step 4: Continue gluing the leaves all the way around the frame.

Friday, March 21, 2014

1st Blogiversary!

 
 Today's the day! The traditional gift for a 1st anniversary is paper and the modern gift is clocks, so here you are: a paper clock, paper slice of cake, paper flower, and paper diamonds! In response to my PaperLove post I received a request for a tutorial on how to make paper flowers like the one on top of the slice of cake. So, for some celebratory crafting:
Materials:
String
Scissors
Thin paper (I used blank newsprint. Weights between tissue and multiuse paper work best)
Step 1: Cut about 8 rectangular sheets of paper and layer them on top of each other. They don't have to be exactly the same size (the imperfection makes for more realistic petals), and obviously the bigger you make the sheets the larger your flower will be. The width is the approximate diameter. These pieces are about 3'' wide.
Step 2: Accordion fold the sheets, parallel to the width.
Step 3: Knot string around the center of the folded sheets, perpendicular to the width.
Step 4: Carefully separate the sheets to arrange them into petals.
Step 5: Sometimes the paper tears slightly on the folded ridges, so cutting the sharp corners off the petals makes the whole flower look more natural.
Also, if you are interested in making these satisfyingly geometric diamonds, I used this post's template, which I printed on cardstock, painted metallic, cut out, scored, and glued together with hot glue. Here's to the coming year of creativity!
Pssst! You can now follow my blog with Bloglovin!
Related Posts Plugin for WordPress, Blogger...