INSTAGRAM

Monday, December 30, 2013

DIY Beaded Tassel

Materials:
A beading needle
A couple inches of wire
Seed beads
Scissors
A large, decorative bead
A spacer bead
Needle nose pliers
Elastic thread
Step 1: Bend a loop in the wire and slide on the spacer and decorative beads. This loop will be the top of the tassel.
Step 2: Bend a loop in the wire, snipping off any extra, on the other end of the decorative bead. This loop will be the bottom of the tassel and will hold the beaded tassel strands.
Step 3: Measure and cut a 10-inch piece of elastic thread. It is going to be folded in half to create two approximately 2-inch long beaded strings of the tassel, allowing fraying and tying room. Obviously if you want your tassel strings to be longer you will have to cut a larger piece. 
Step 4: Thread the elastic into the eye of the beading needle.
Step 5: Pull the beading needle through the bottom wire loop so you have two equal pieces of elastic sticking out each side of the loop.
Step 6: Thread seed beads onto one side of the elastic. Remove the needle and tie a knot at the end of the string.
Step 7: Repeat step 6 for the other half of the elastic.
Step 8: Now your tassel has two full beaded strands. Repeat steps 3 through 7 to add as many strands as you think suits your tassel.
It will add some sparkle to your wardrobe or décor!


Wednesday, December 25, 2013

Merry Christmas!

"For to us a child is born, to us a son is given; and the government shall be upon his shoulder, and his name shall be called Wonderful Counselor, Mighty God, Everlasting Father, Prince of Peace." 
Isaiah 9:6


Tuesday, December 24, 2013

Friday, December 20, 2013

Candy Cane Carnations

My mom bought these intricately striped carnations and they totally remind me of candy canes.
See that refreshing resemblance? Clearly they make a festive bouquet.


Wednesday, December 18, 2013

Scallop Shoes Arrival

I received my Milk and Honey prize shoes the other day! The package was delivered by a postman working extensive Christmas hours, so it arrived in the evening as a lovely early Christmas gift.
 
It was so delightfully suspenseful to unwrap the box and discover the shoes made of my Scallop fabric.
They are excellent quality shoes.
Whatever time they spend off my feet they will probably spend on my shelf so I can squeal at their cheery beauty. Thanks Milk and Honey and Spoonflower!


Friday, December 13, 2013

Snow-Bound

"...Shut in from all the world without,
We sat the clean-winged hearth about.
Content to let the north-wind roar
In baffled rage at pane and door,
While the red logs before us beat
The frost-line back with tropic heat;
And ever, when a louder blast
Shook beam and rafter as it passed,
The merrier up its roaring draught
The great throat of the chimney laughed..."
--John Greenleaf Whittier in Snow-Bound

Saturday, December 07, 2013

Tinseltown

Tinseltown Christmas Emporium is a year-round Christmas store in Ottawa, Ontario. Attached to Tinseltown, and run by the same owners, is Marie Antoinette & co., an equally astounding boutique of luxurious décor. They are the type of place you walk into and spend half an hour gaping at the first bursting, glittery display. Then you realize you've only stepped one foot past the entrance. Every time you turn around there's some new, wonderful, glamorous item you missed in your awe-struck meandering--items like these: 
Really, if a store's ceiling is this gorgeous, you know you've found a true treasure.
 Obviously I highly recommend visiting these lovely locales! And what's the best news? The two stores are expanding in the spring!


Sunday, December 01, 2013

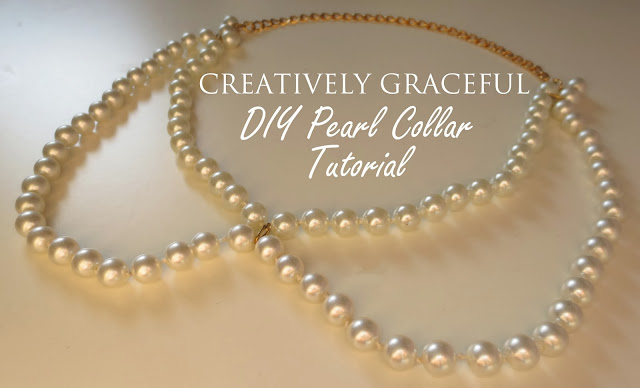
DIY Pearl Collar Necklace

Materials:
A bracelet chain with a clasp
4 jump rings
A shorter string of pearl beads (mine was 10'')
A longer string of pearl beads (mine was 17'')
Pliers
Step 1: Secure the two strings of pearls with a jump ring at their centers.
Step 2: Fasten one of the ends of the two strings of pearls together with a jump ring, leaving one pearl free on the longer string.
Step 3: Attach the non-clasp end of the bracelet to the longer string of pearls with yet another jump ring.
Step 4: Use the final jump ring to secure the other two ends of the two strings of pearls together, again leaving one pearl free on the longer string. That pearl will hold the clasp to close the necklace.
There you have it! A classy collar necklace to dress up even the simplest t-shirt.
Related Posts Plugin for WordPress, Blogger...